
Tissue Paper Flowers

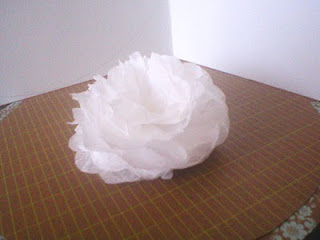
I have seen so many people making their own flowers. I tried a few here and there but they were ok. But now that I have my Cuttlebug, I tried some with tissue paper and I finally hit the jackpot. I love the way they turned out. They look like Carnation flowers.  Here is how I did it.


1. I used Nestabilities dies Big Scalloped Circles SM

2. Then I cut the tissue paper in multiple layers and sizes.

3. Added a brad to hold the two sizes of layers together.


4. Then fold up the layers upward and smush together.


5. Finally, pull the layers back layer by layer and shape.


Plus you can color them with mists and even paint. That was the fun part! So here are some of them.


Here is one I made with newspaper and blue watercolor paint.


Well, I hope this inspired you to try it. Have fun!

Comments

  1. These look really fun to make!!! Thanks for sharing!!!

    ReplyDelete
  2. These are so nice! They really do look like carnations, thanks for sharing!

    ReplyDelete
  3. Nice! I need to try some tissue paper, it makes a great flower.

    ReplyDelete
  4. Kelly, your flowers are gorgeous. Thank you for the tutorial. I need to go buy tissue paper! They are lovely.

    ReplyDelete
  5. Oh Kelly, they're gorgeous!! My favorite flower and I sure will give them a try! Thanks for sharing.

    ReplyDelete
  6. Thanks for sharing all the steps. These are AMAZING! SO pretty! Can't wait to see them in "action" on a card! (:

    ReplyDelete
  7. ohhhhhh wowow!!! they're cool. they remind of those carnations we made from tissues and stuck on wedding cars. ack. just dated myself. again. lmao...oooooooooooooo

    ReplyDelete
  8. Kelly these turned out so pretty and feminine,love the newspaper one especially!!

    ReplyDelete

Post a Comment

Popular posts from this blog

Soul Sistah Painting

I love trying new things in art. It is like an adventure and a hearty challenge. So after I saw this picture of the soul singer Ledisi, I just had to try it. Love the dark eye shadow and the head tilted. So dramatic! When I first tried adding the blue eye shadow to my painting it looked cool to me. But when I had my hubby look at it he nicely told me the blue I did made her eyes look hollow! LOL! So I went back and added a lighter blue and that did it! So here are some pictures showing the progression of my version of Ledisi. Thanks for stopping by! Have a super day.

My Birthday Blog Party

Welcome to my Birthday Blog Party! I am starting my celebration early to fully enjoy my day. My actual birthday is May 29th but why not start early right? :) When I think of birthdays past, they were always such exciting times for me. Many of my birthdays were celebrated with fun parties from my childhood to my young adult years. I loved all of those special parties and to this day, I still love it. Maybe this is where my love for event planning all started. At my 3rd birthday, my parents gave me a big one. I don't really remember but the pictures are so cool. I had lots of kids there, a clown, a little merry-go-round ride and lots of games. I had a white little outfit on and was looking so cute for a Spring party. Boy, I looked so happy! Also, I was brave not to be afraid of the clown, too. My mom was holding me as I blew the candles out. Another year, I had my first slumber party. That was so fun! I invited several friends and a cousin. It was so great to have m

Under the Trees (updated)

Last Sunday, my husband and I went to one of our local parks. It was a nice, sunny and warm afternoon but the breeze was just heavenly. We found a shady spot full of all types of trees and laid out and just relaxed. So here is a layout I did from that lazy Sunday. I scrap lifted this idea from Latrice Murphy's layout in the August 2014 issue of Paper Craft & Scrapbooking magazine on page 59. I saw the online copy and when I saw her layout, it went in my memory to try at some point. A great way to use up all those scraps I had sitting around, too. I love the wood grain paper paired with all the bright patterned paper.  We laughed as I took the "selfie" of us laying around. I splattered white gesso paint around. This little leather sticker was a fun touch. Thanks for stopping by! Have a great day! 7/25/14 After looking at this layout this morning I decided to add some gold glitter paper banners to really finish it off. Now I feel sati